はじめに
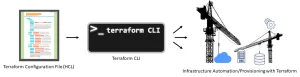
前回の記事では、Terraform プロジェクトディレクトリの初期化方法や、構成ファイルの書き方について学びました。今回の記事では、Terraform におけるリソースのライフサイクルについて学びます。リソースが作成されてから削除されるまでに、どのようなステップを経るのかを見ていきましょう。
Terraform を使って、AWS 上に S3(AWS Simple Cloud Storage)を作成し、リソースのライフサイクルについて学んでいきます。

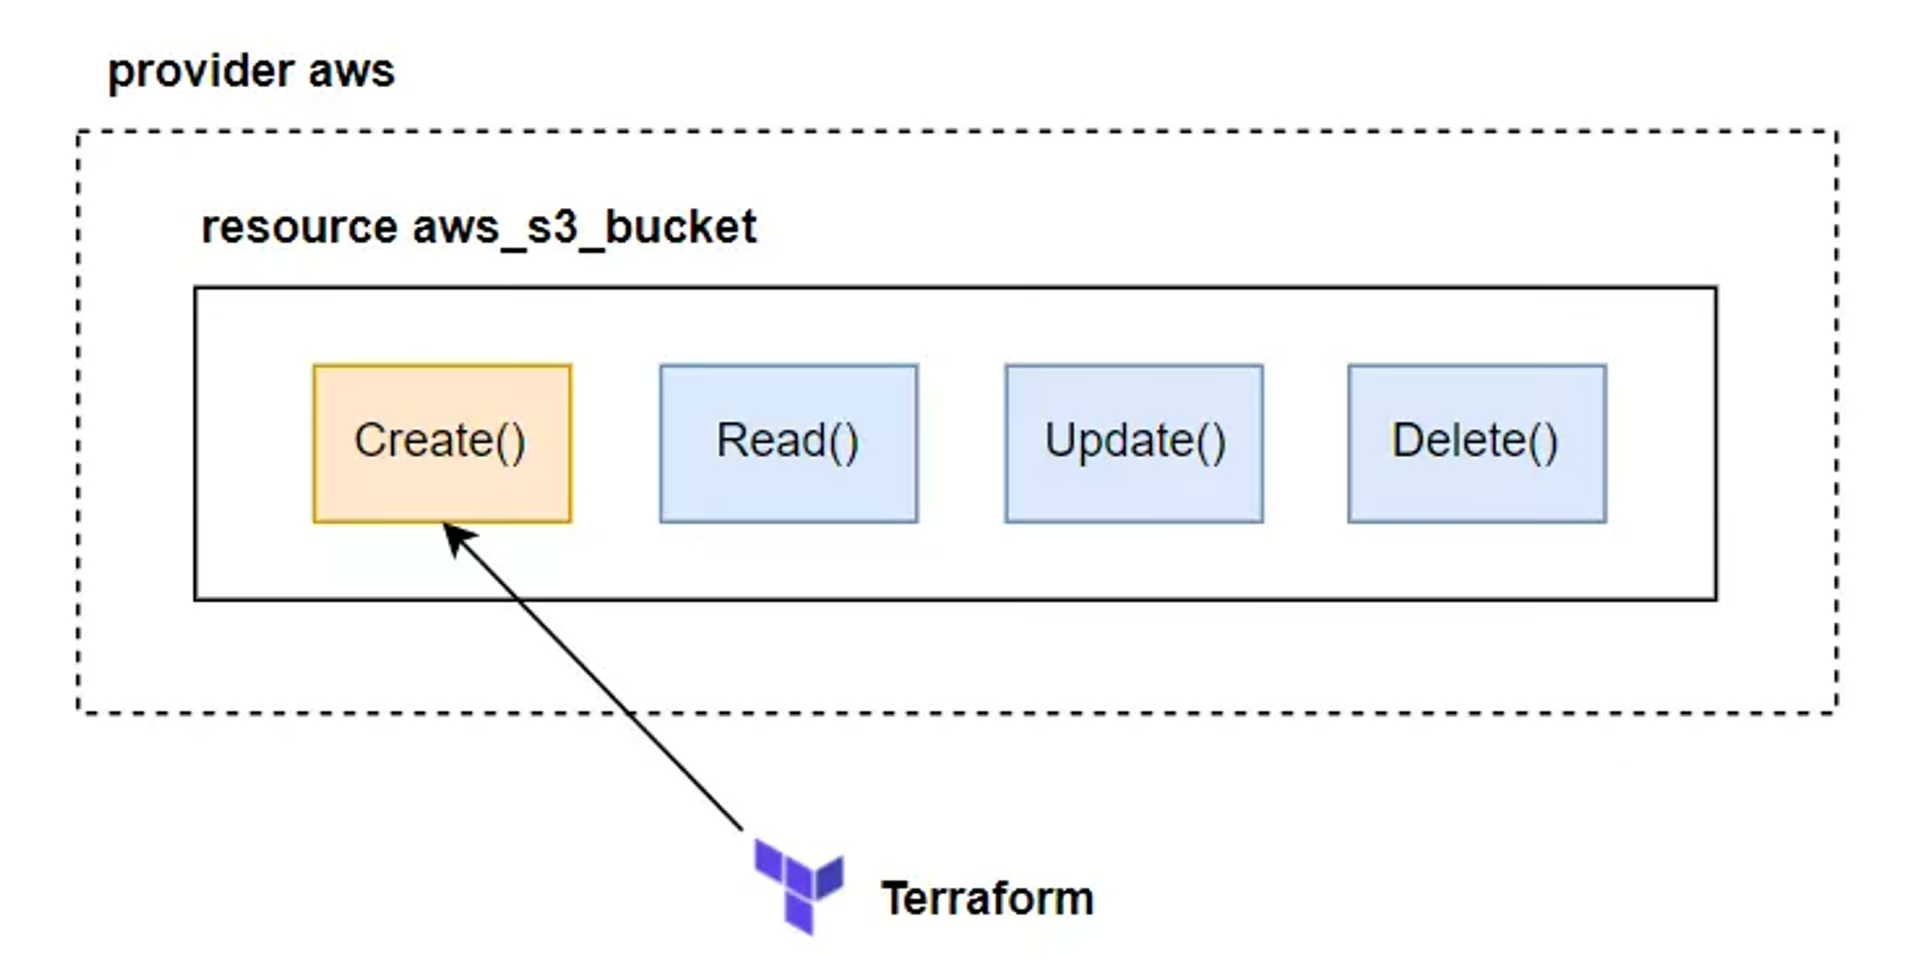
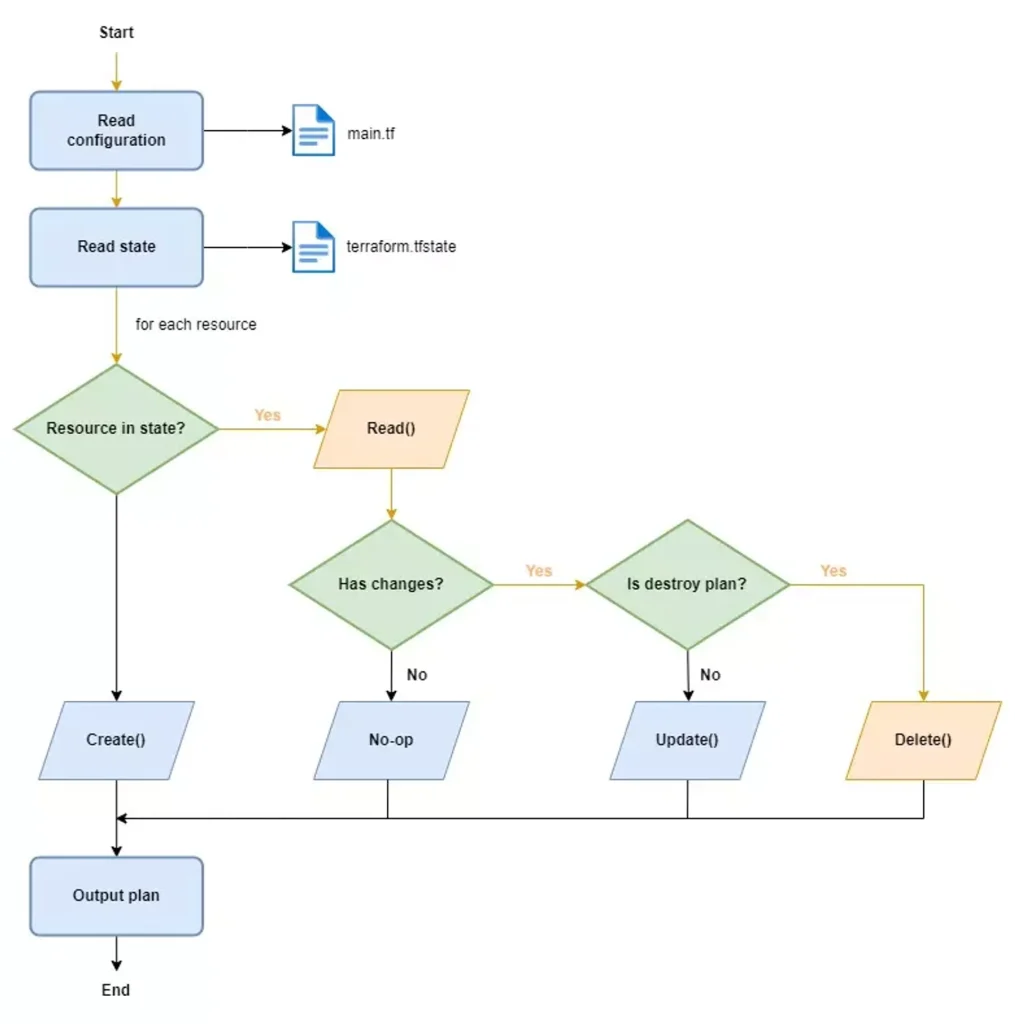
Terraform のライフサイクルの中で呼び出される関数。
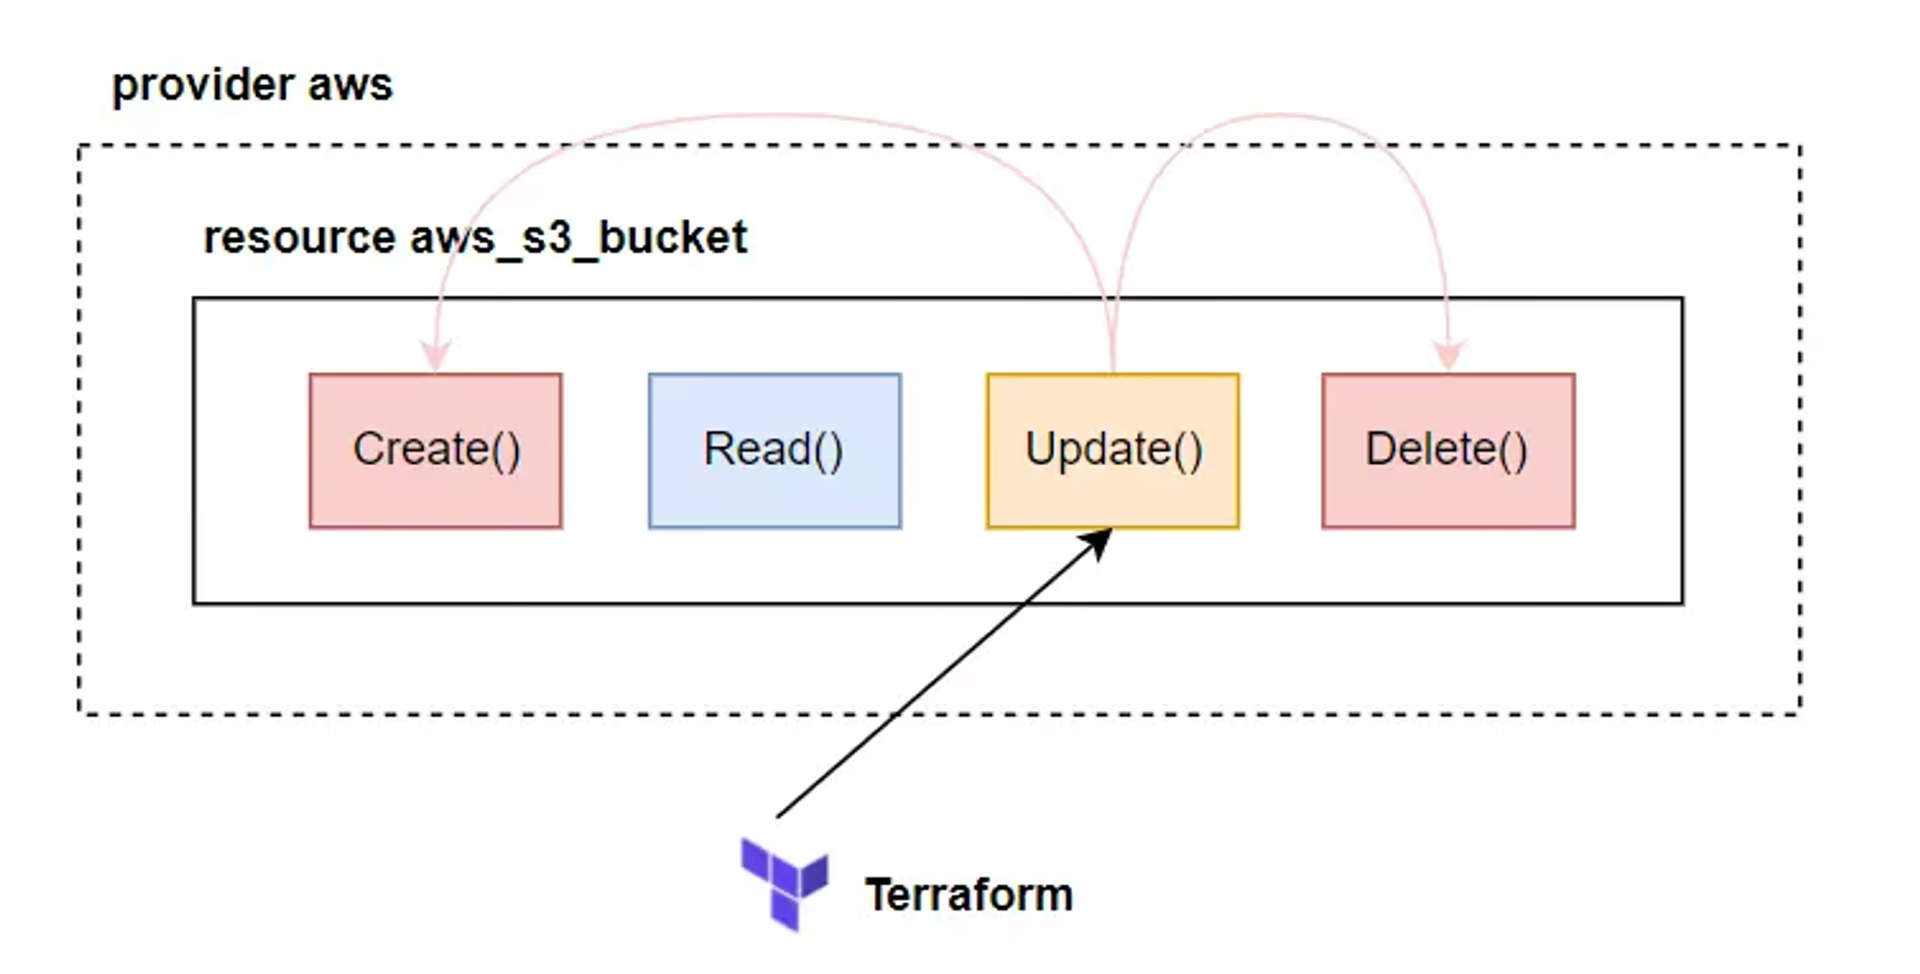
Tất cả các resource type của Terraform đều Implement một CRUD Interface, trong CRUD Interface này sẽ có các hàm là Create(), Read(), Update(), Delete() và những hàm này sẽ được thực thi nếu gặp đúng điều kiện phù hợp. Còn data type của Terraform thì Implement một Read Interface chỉ có một hàm là Read(), hình minh họa.
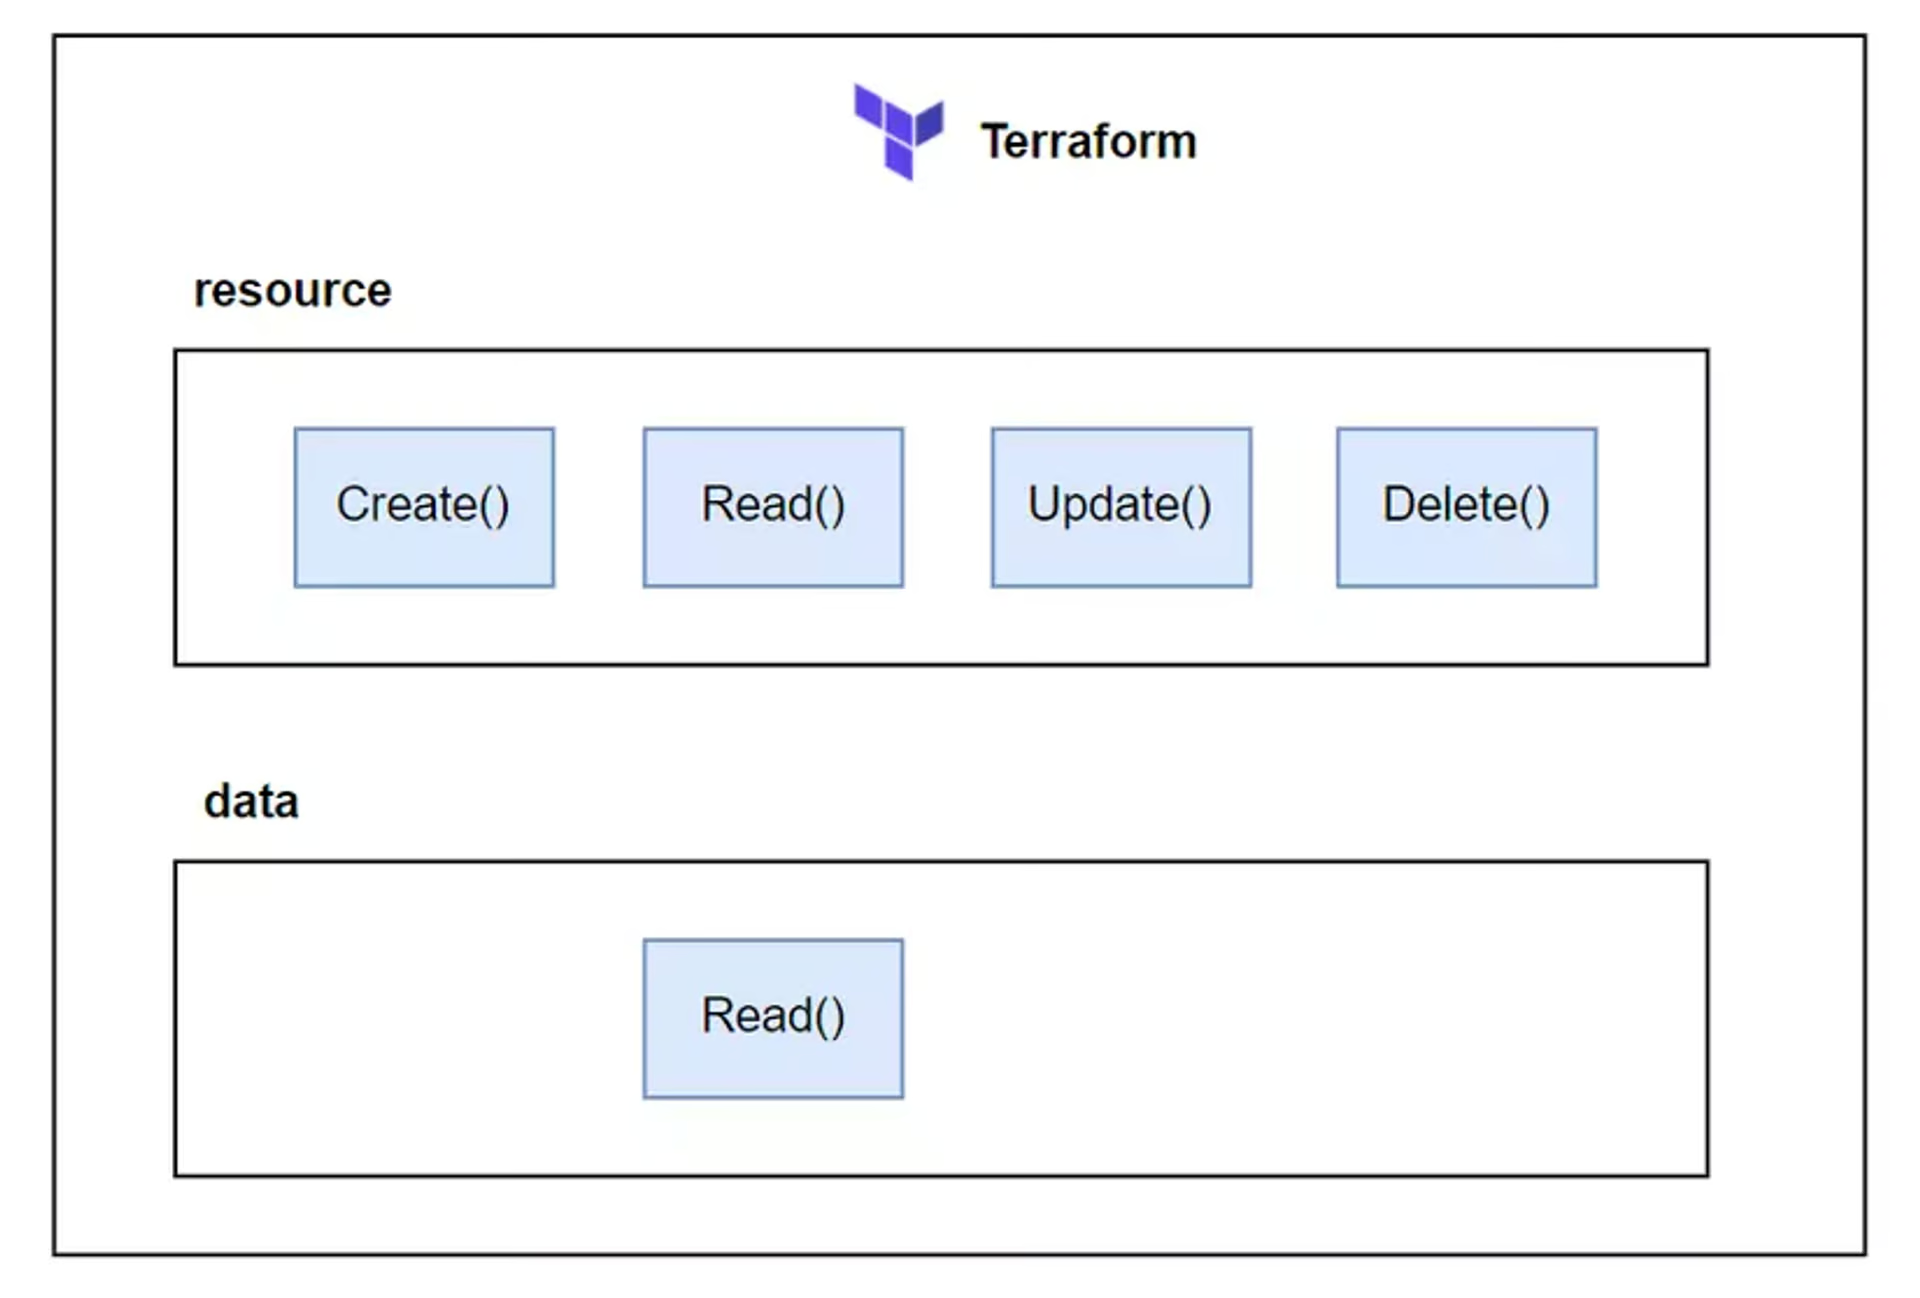
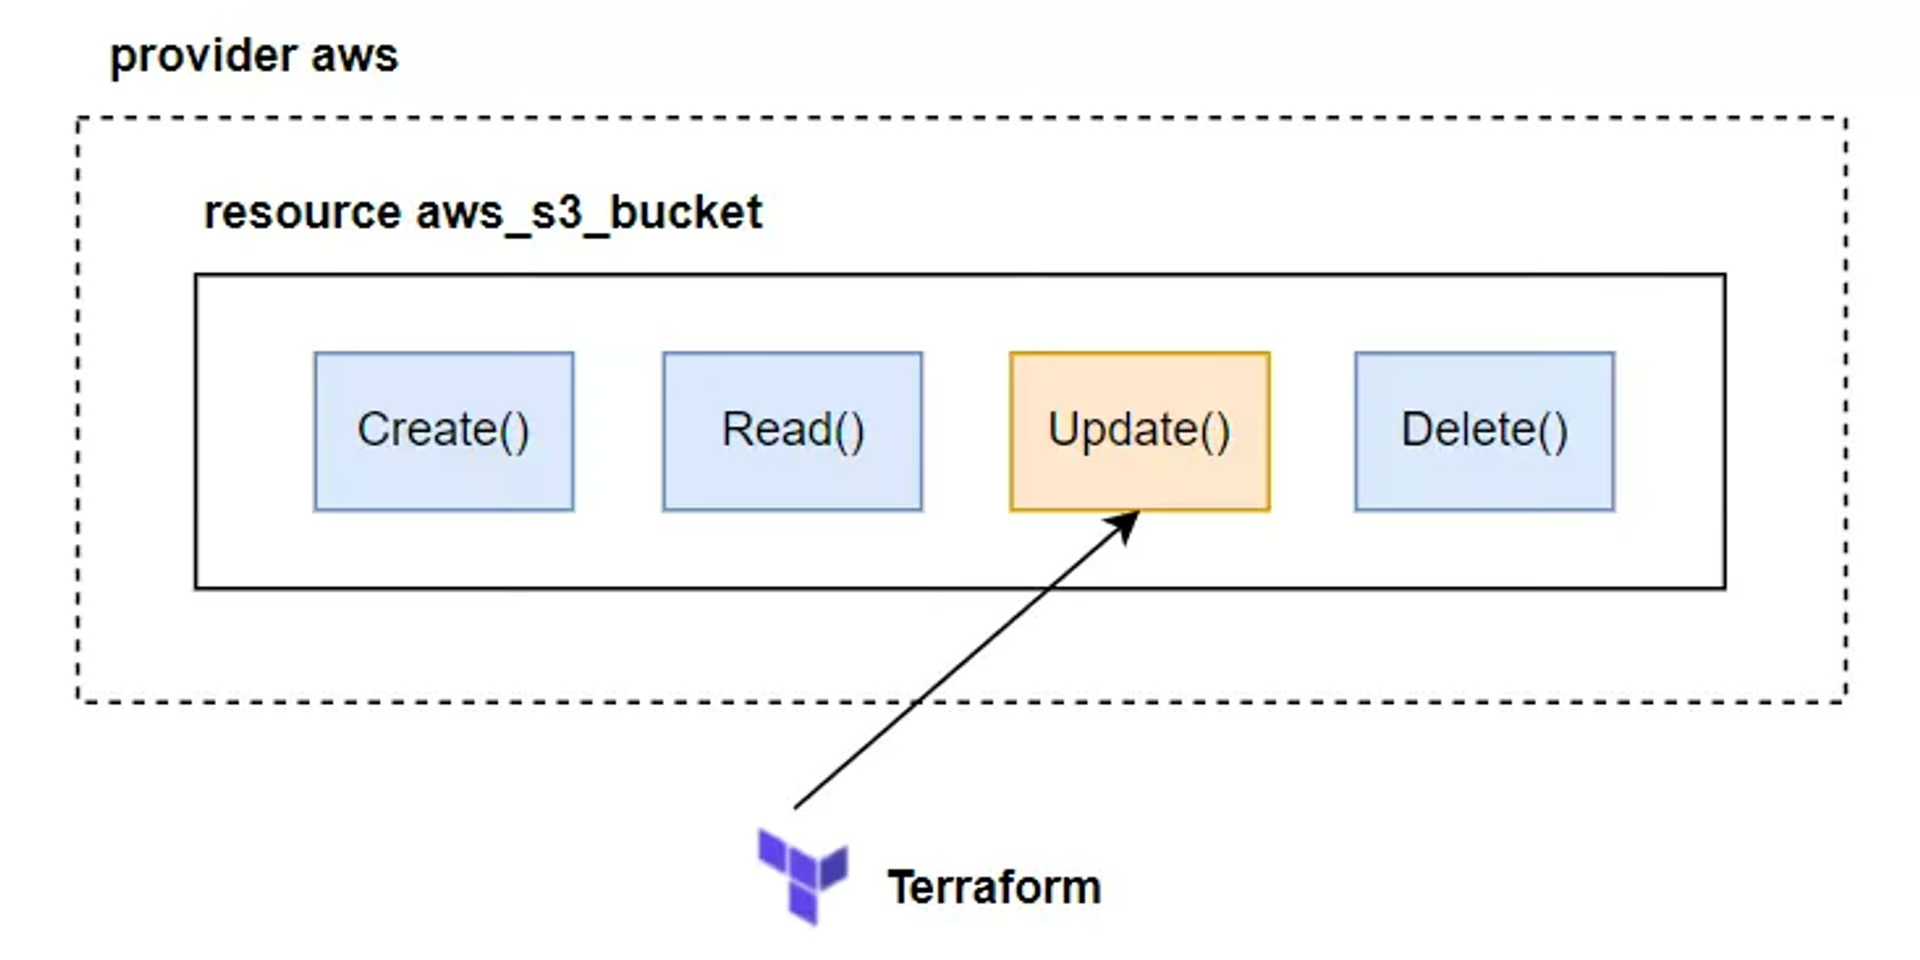
Create() sẽ được gọi trong quá trình tạo resource, Read() được gọi trong quá trình plan, Update() được gọi trong quá trình cập nhật resource, và Delete() được gọi trong quá trình xóa resource.
S3 の例
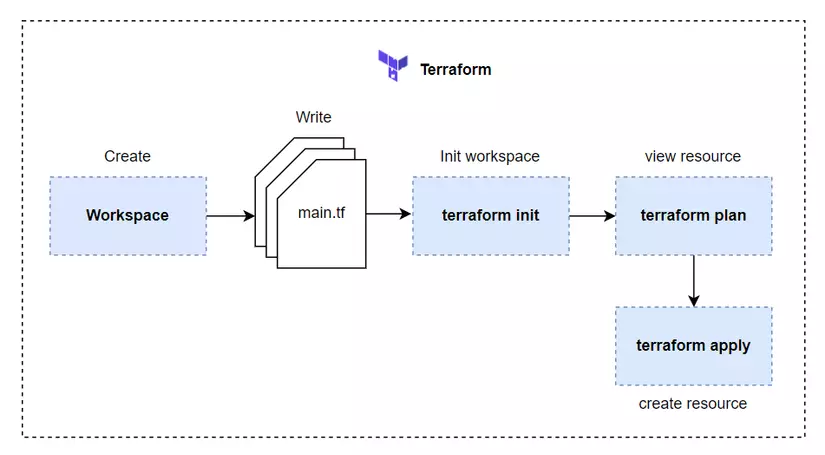
これから Terraform ファイルを作成して S3 を作成し、上記の各関数について簡単に説明します。s3 という名前のワークスペースを作成し、その後 main.tf という名前のファイルを作成し、次のコードを記述します。
provider "aws" {
  region = "us-west-2"
}

resource "aws_s3_bucket" "terraform-bucket" {
  bucket = "terraform-series-bucket"

  tags = {
    Name        = "Terraform Series"
  }
}
Ở tệp tin trên trên ta dùng resource là aws_s3_bucket, đây là resource dùng để tạo S3 Bucket trên AWS Cloud, trong đó trường bucket sẽ là tên Bucket của ta. Sau khi viết xong thì ta chạy câu lệnh init để Terraform tải Provider xuống Workspace hiện tại.
terraform initプラン
前回の記事でも述べたように、リソースを作成する前に terraform plan を実行して、どのリソースが作成されるかを確認するのが望ましいです。
また、terraform plan は単に新しく作成されるリソースを表示するだけでなく、すでに存在するリソースに対して Terraform ファイル内の値を変更した場合、それがどのように更新されるかも表示してくれます。これは、以前に作成されたリソースの状態(State)に基づいて行われます。
もし Terraform ファイル内に変更がない場合は、terraform plan を実行しても、追加または更新されるリソースはないと表示されます。
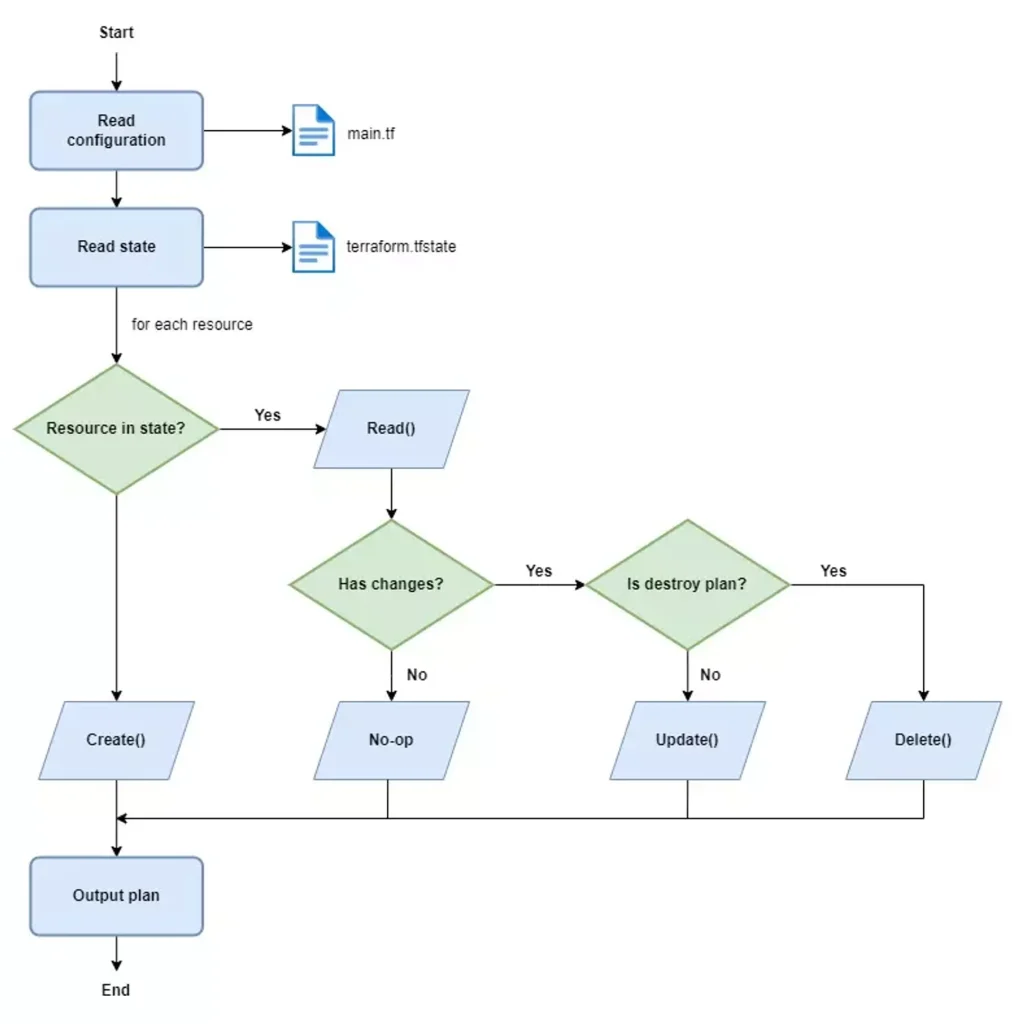
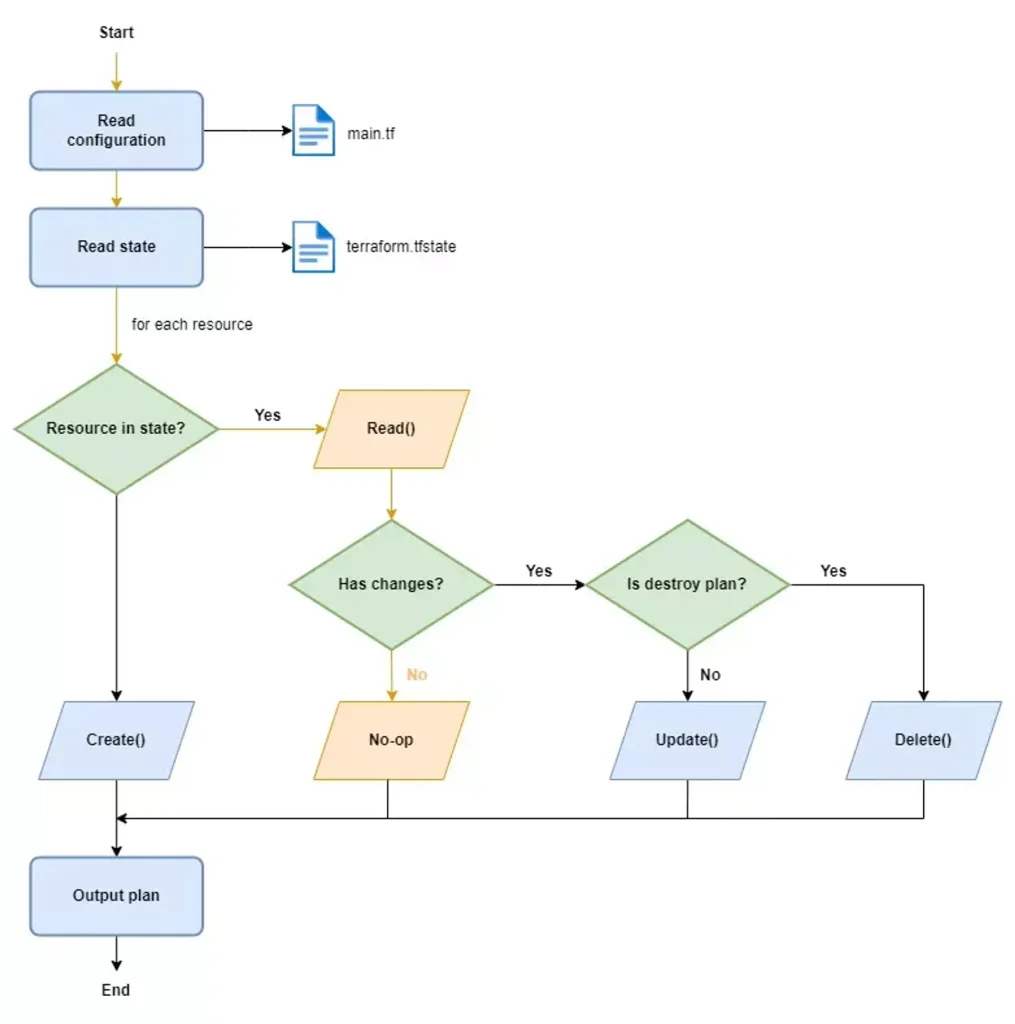
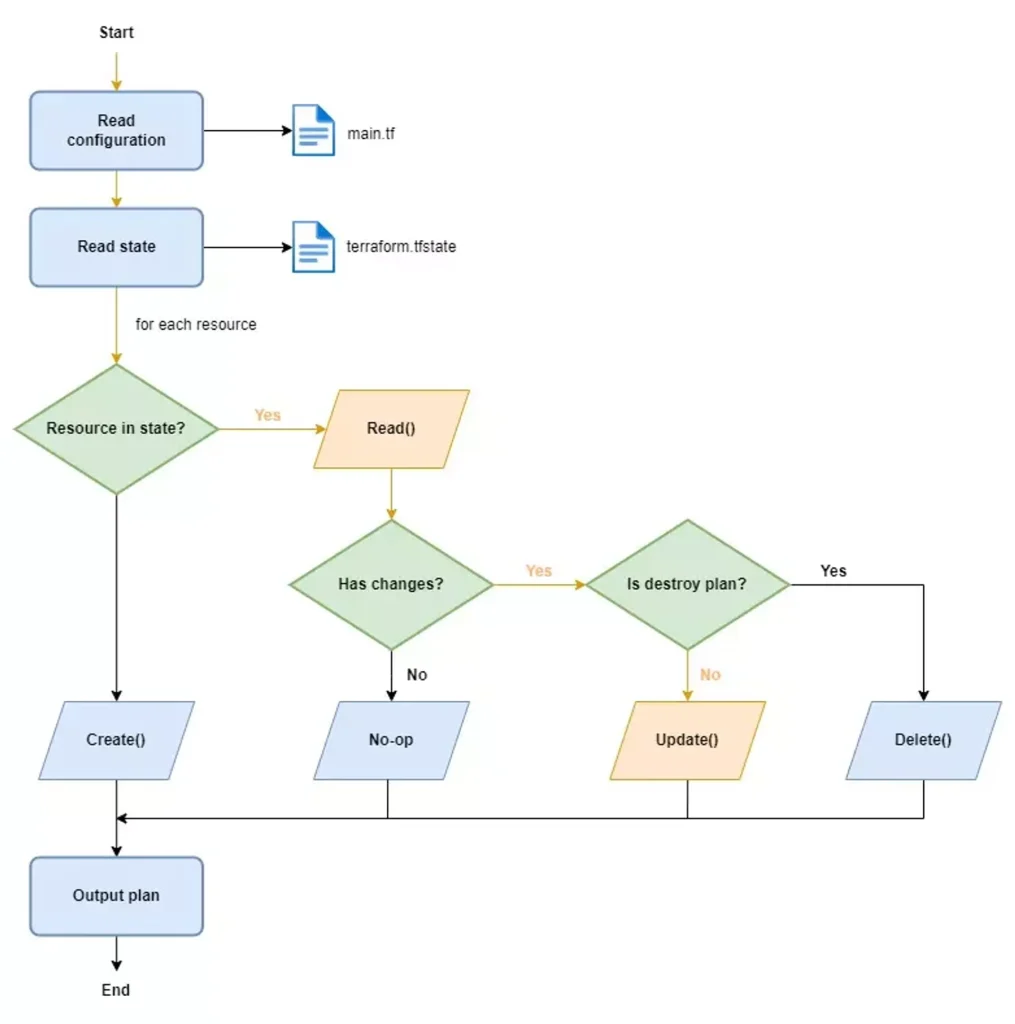
この plan プロセスはとても有用な出力を提供してくれます。出力を読むだけで、自分のインフラにどのような変更が加えられるのかが分かります。terraform plan コマンドを実行すると、Terraform は主に以下の3つのステップを実行します。
- 設定ファイルと State ファイルの読み込み – Terraform はまず、設定ファイルと(存在する場合は)State ファイルを読み込み、リソースに関する情報を取得します。
- 次に実行すべきアクションの決定 – Terraform は計算を行い、どのアクション(
Create()、Read()、Update()、Delete()、あるいは何もしないNo-op)が実行されるべきかを判断します。 - 出力
S3の作成
次に、apply コマンドを実行して AWS 上に S3 を作成します。apply を実行すると、確認ステップが追加され、「yes」と入力するように求められます。
確認ステップをスキップしたい場合は、コマンドに -auto-approve オプションを付けて実行します。
terraform apply -auto-approveTerraform used the selected providers to generate the following execution plan. Resource actions are indicated with the
following symbols:
+ create
Terraform will perform the following actions:
# aws_s3_bucket.terraform-bucket will be created
+ resource "aws_s3_bucket" "terraform-bucket" {
...
}
Plan: 1 to add, 0 to change, 0 to destroy.
aws_s3_bucket.terraform-bucket: Creating...
aws_s3_bucket.terraform-bucket: Still creating... [10s elapsed]
aws_s3_bucket.terraform-bucket: Creation complete after 15s [id=terraform-series-bucket]
Apply complete! Resources: 1 added, 0 changed, 0 destroyed.apply コマンドの実行が完了すると、Terraform は terraform.tfstate という名前のファイルを生成します。
このファイルを開くと、S3 に関する情報が記録されているのが確認できます。
また、AWS の Web コンソールを開けば、自分の S3 バケットが作成されていることを確認できます。
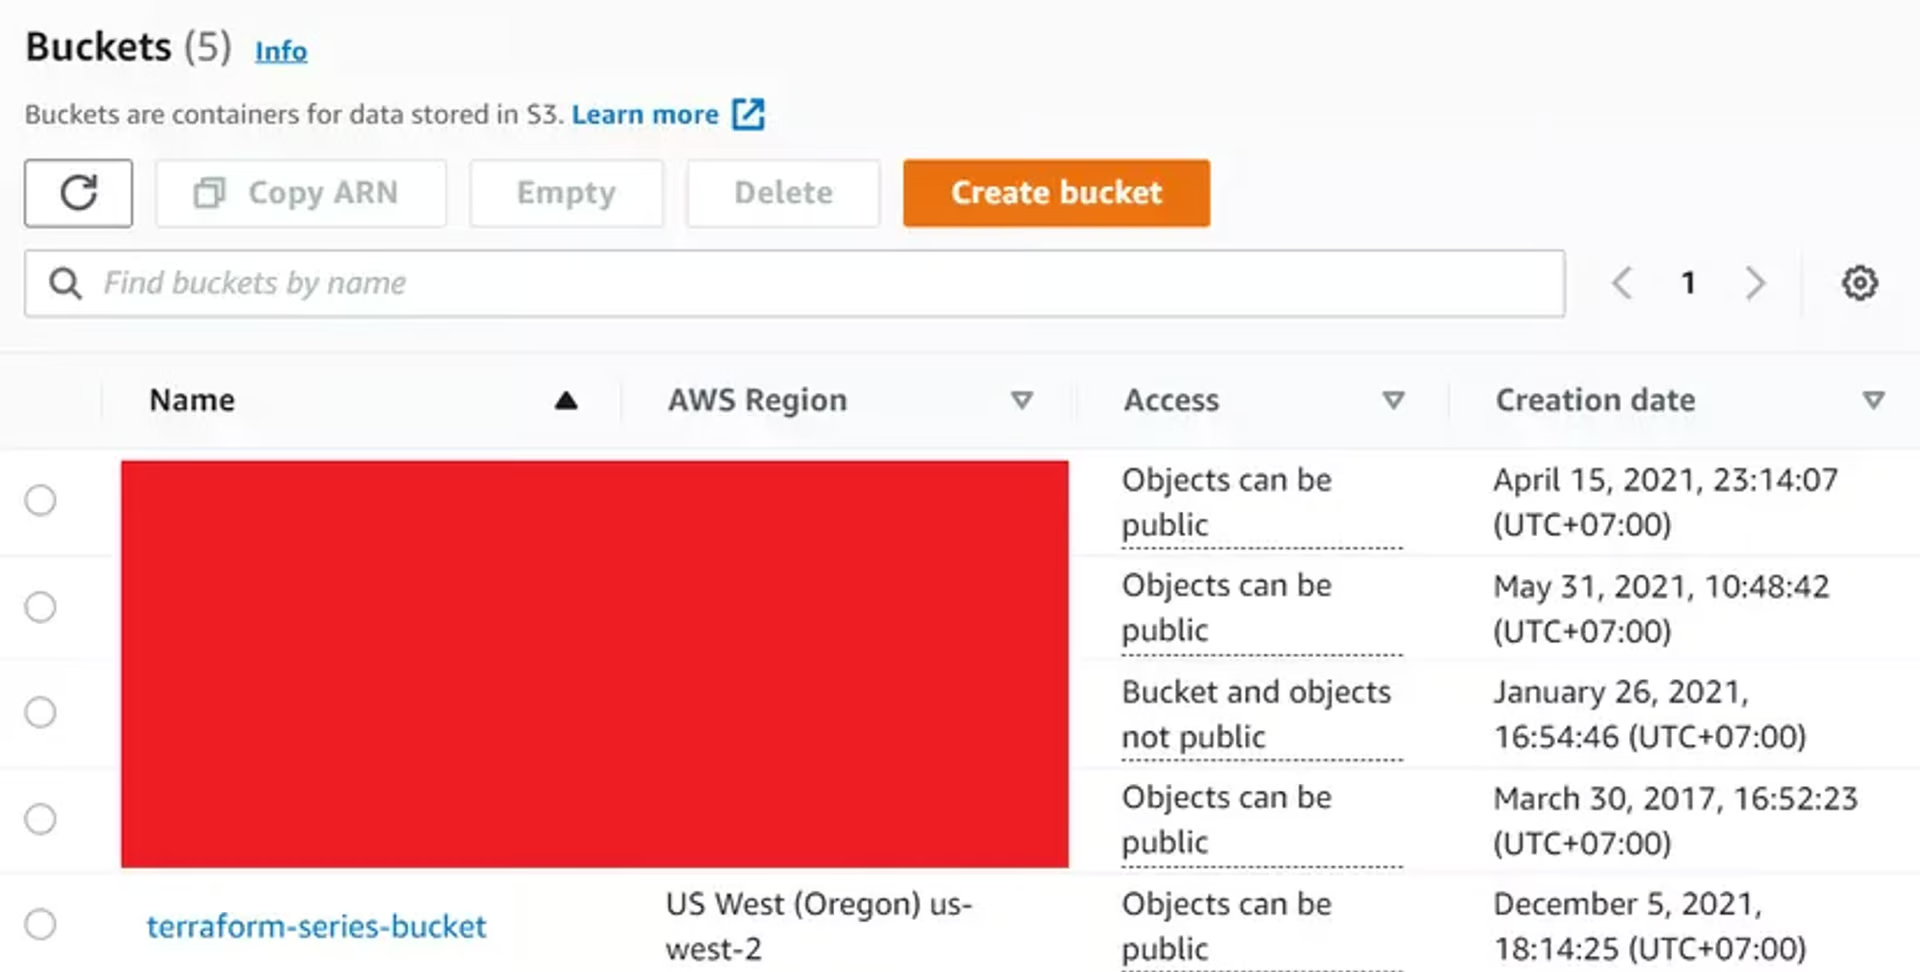
Terraform はどのようにしてこの S3 バケットを作成したのでしょうか?
それは apply の過程で、aws_s3_bucket リソースの Create() 関数が呼び出されるからです。
No-op
リソースを作成し終えたあと、設定ファイルに何も変更を加えていない場合、plan を実行すると Terraform は No-op(何もしない)ステップを通過します。
このとき、Terraform はまず設定ファイルを読み込み、次に State ファイルが存在することを検出して、それも読み込みます。
以下のようにイメージできます。
State ファイルの読み込みが完了した後、Terraform はその中に S3 バケットの情報が存在するかどうかを確認します。
存在していれば、Terraform は aws_s3_bucket リソースの Read() 関数を実行します。
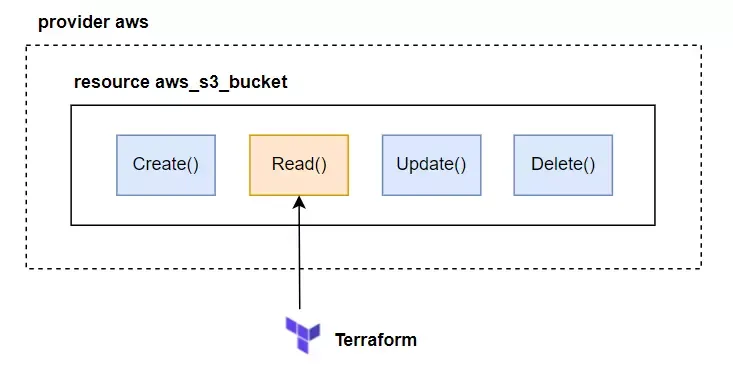
Read() 関数には、現在の S3 バケットの情報を取得するために AWS の API を呼び出すコードが含まれています。
その後、取得した情報は State ファイル内の S3 バケットの情報と比較されます。
もし差分がなければ、Read() 関数は「変更なし」という結果を返し、Terraform は一切のアクションを実行しません。
S3 の更新
Terraform には update コマンドというものは存在しません。
設定ファイルを修正して apply コマンドを再実行するだけで、Terraform は自動的にリソースの更新が必要かどうかを判断してくれます。
ここでは、S3 バケットの名前を変更してみましょう。
provider "aws" {
  region = "us-west-2"
}

resource "aws_s3_bucket" "terraform-bucket" {
  bucket = "terraform-series-bucket-update"

  tags = {
    Name        = "Terraform Series"
  }
}
その後、再度 terraform plan コマンドを実行します。
aws_s3_bucket.terraform-bucket: Refreshing state... [id=terraform-series-bucket]

Terraform used the selected providers to generate the following execution plan. Resource actions are indicated with the
following symbols:
-/+ destroy and then create replacement

Terraform will perform the following actions:

  # aws_s3_bucket.terraform-bucket must be replaced
-/+ resource "aws_s3_bucket" "terraform-bucket" {
      + acceleration_status         = (known after apply)
      ~ arn                         = "arn:aws:s3:::terraform-series-bucket" -> (known after apply)
      ...
    }

Plan: 1 to add, 0 to change, 1 to destroy.

───────────────────────────────────────────────────────────────────────────────────────────────────────────────────────────

Note: You didn't use the -out option to save this plan, so Terraform can't guarantee to take exactly these actions if you
run "terraform apply" now.
すると、Terraform は S3 バケットを「更新」するのではなく、一度削除してから新しく作成するという動作を行うことが分かります。
つまり、まず古い S3 バケットを削除し、その後に新しい名前で S3 バケットを作成します。
なぜこのような挙動になるのでしょうか?
それは、aws_s3_bucket リソースの bucket 属性が Force New(強制的に新規作成される)属性 だからです。
このような属性は変更できず、値が変わった場合はリソース全体を再作成する必要があります。
Terraform では、リソースの属性(プロパティ)は大きく分けて 「Force New」 と 「Normal Update」 の2種類があります。
- Force New:リソースは削除されてから再作成されます。
つまり、まず既存のリソースが削除され、その後に新しいリソースが作成されます。
- Normal Update:リソースは通常通りに更新され、既存のリソースを削除する必要はありません。
ある属性が Force New に分類されるか Normal Update に分類されるかは、使用している Provider によって決まります。
上記の例では、aws_s3_bucket の Force New 属性 を変更したため、Terraform はリソースを一度削除してから再作成しました。
ただし、リソースの削除と再作成には多くのリスクや問題が伴う可能性があるため、常に terraform plan を実行して、なぜそのような動作が発生するのかを事前に確認することが非常に重要です。
今回のように、S3 バケットはまだ新しく、中にデータも入っていないので、そのまま terraform apply を実行して問題ありません。Terraform に任せてリソースを安全に更新させましょう。
terraform apply -auto-approveaws_s3_bucket.terraform-bucket: Refreshing state... [id=terraform-series-bucket]
Terraform used the selected providers to generate the following execution plan. Resource actions are indicated with the
following symbols:
-/+ destroy and then create replacement
Terraform will perform the following actions:
# aws_s3_bucket.terraform-bucket must be replaced
-/+ resource "aws_s3_bucket" "terraform-bucket" {
+ acceleration_status = (known after apply)
~ arn = "arn:aws:s3:::terraform-series-bucket" -> (known after apply)
...
}
Plan: 1 to add, 0 to change, 1 to destroy.
aws_s3_bucket.terraform-bucket: Destroying... [id=terraform-series-bucket]
aws_s3_bucket.terraform-bucket: Destruction complete after 1s
aws_s3_bucket.terraform-bucket: Creating...
aws_s3_bucket.terraform-bucket: Still creating... [10s elapsed]
aws_s3_bucket.terraform-bucket: Creation complete after 15s [id=terraform-series-bucket-update]
Apply complete! Resources: 1 added, 0 changed, 1 destroyed.実行が完了すると、新しい名前の S3 バケットが作成されていることが確認できます。

S3の削除
リソースを削除するには、destroy コマンドを使用します。apply コマンドと同様に、確認ステップがあり、「yes」と入力する必要がありますが、-auto-approve オプションを付ければ、確認ステップをスキップすることができます。
terraform destroy -auto-approveaws_s3_bucket.terraform-bucket: Refreshing state... [id=terraform-series-bucket-update]
Terraform used the selected providers to generate the following execution plan. Resource actions are indicated with the
following symbols:
- destroy
Terraform will perform the following actions:
# aws_s3_bucket.terraform-bucket will be destroyed
- resource "aws_s3_bucket" "terraform-bucket" {
- acl = "private" -> null
- arn = "arn:aws:s3:::terraform-series-bucket-update" -> null
...
}
Plan: 0 to add, 0 to change, 1 to destroy.
aws_s3_bucket.terraform-bucket: Destroying... [id=terraform-series-bucket-update]
aws_s3_bucket.terraform-bucket: Destruction complete after 1s
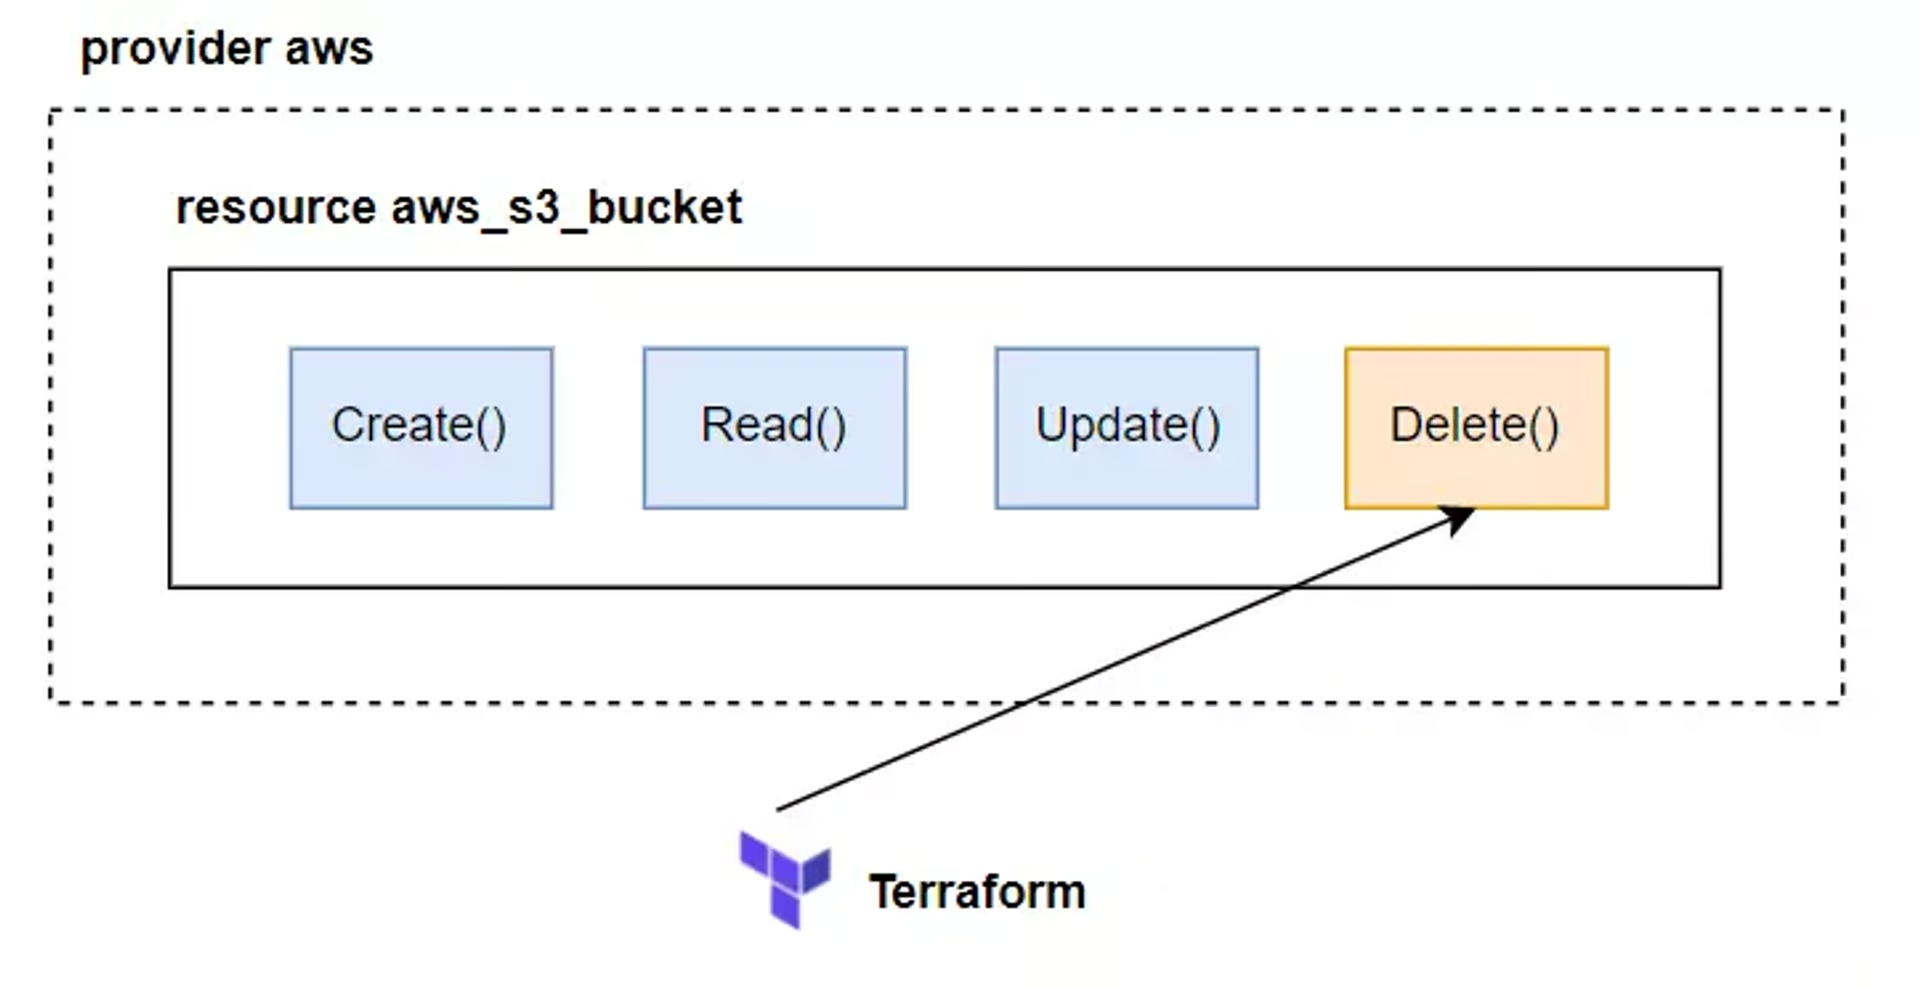
Destroy complete! Resources: 1 destroyed.destroy コマンドを実行すると、Terraform はまず自分の State ファイルを読み込み、その中に該当するリソースが存在するかどうかを確認します。
もし存在すれば、Terraform は aws_s3_bucket リソースの Delete() 関数を実行して、そのリソースを削除します。
destroy コマンドの実行が完了すると、ワークスペースの状態は次のようになります。
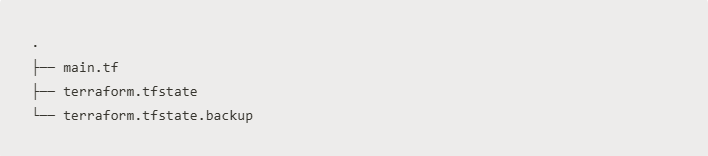
新たに terraform.tfstate.backup というファイルが生成されているのが確認できます。
このファイルは、リソースの以前の状態(State)を確認するためのバックアップであり、変更前の状態を追跡する目的で使用されます。
また、もし設定ファイル内のすべてのリソース定義を削除してから terraform apply を実行した場合、これは terraform destroy を実行したのと同じ効果になります。
これで、Terraform におけるリソースのライフサイクル(作成、読み取り、更新、削除)についての説明は完了です。
次に取り上げるのは、Terraform 以外の方法でリソースが変更された場合はどうなるのか? というよくある問題です。
Terraform はこのような外部変更(ドリフト)にどう対応するのでしょうか?続きを見ていきましょう。
Resource Drift(リソースのドリフト)
リソースドリフトとは、Terraform の外部でリソースの設定が変更されることによって発生する問題です。
たとえば AWS の場合、Terraform で作成したリソースに対して、誰かが AWS Web コンソール を使って設定を変更してしまうようなケースが該当します。
上記の例に戻ると、Terraform で作成した S3 バケットに対して Web コンソール経由で何か設定変更を加えた場合、それが Resource Drift になります。
Terraform 側ではまだ変更前の情報を保持しているため、状態(State)と実インフラの間にズレが生じてしまうのです。
provider "aws" {
  region = "us-west-2"
}

resource "aws_s3_bucket" "terraform-bucket" {
  bucket = "terraform-series-bucket-update"

  tags = {
    Name        = "Terraform Series"
  }
}
terraform apply -auto-approve...
Plan: 1 to add, 0 to change, 0 to destroy.
aws_s3_bucket.terraform-bucket: Creating...
aws_s3_bucket.terraform-bucket: Still creating... [10s elapsed]
aws_s3_bucket.terraform-bucket: Creation complete after 15s [id=terraform-series-bucket-update]
Apply complete! Resources: 1 added, 0 changed, 0 destroyed.その後、AWS の Web コンソールにアクセスして、S3 バケットの tags フィールドを修正します。
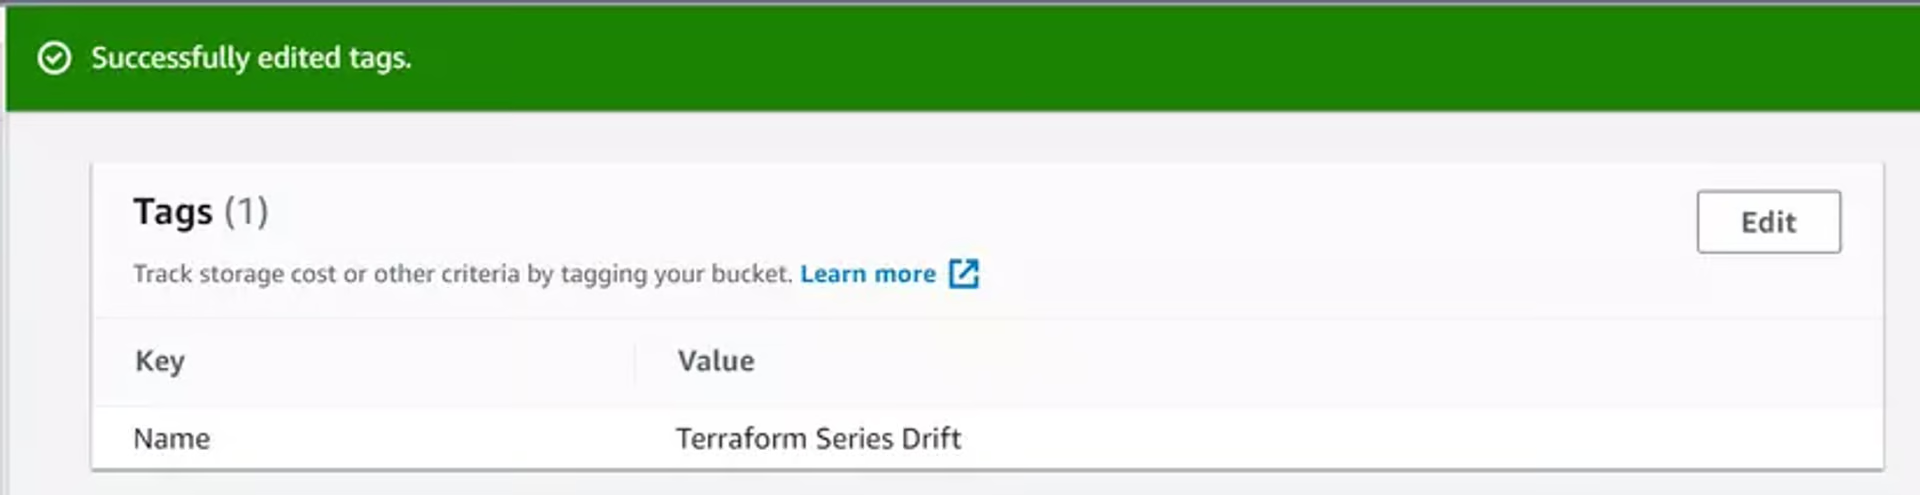
Terraform は自動で変更を検出して設定ファイルを更新するようなことはしません。そんなに魔法のような存在ではありません。
ですが、apply コマンドを実行すると、Terraform はその変更を検出し、Terraform の設定ファイルに書かれている tags と一致するように、外部で変更された tags を元に戻します。
まずは plan コマンドを実行して確認してみましょう。
aws_s3_bucket.terraform-bucket: Refreshing state... [id=terraform-series-bucket-update]

Note: Objects have changed outside of Terraform

Terraform detected the following changes made outside of Terraform since the last "terraform apply":

  # aws_s3_bucket.terraform-bucket has been changed
  ~ resource "aws_s3_bucket" "terraform-bucket" {
        id                          = "terraform-series-bucket-update"
      ~ tags                        = {
          ~ "Name" = "Terraform Series" -> "Terraform Series Drift"
        }
      ~ tags_all                    = {
          ~ "Name" = "Terraform Series" -> "Terraform Series Drift"
        }
        # (9 unchanged attributes hidden)

        # (1 unchanged block hidden)
    }

...

Terraform used the selected providers to generate the following execution plan. Resource actions are indicated with the
following symbols:
  ~ update in-place

Terraform will perform the following actions:

  # aws_s3_bucket.terraform-bucket will be updated in-place
  ~ resource "aws_s3_bucket" "terraform-bucket" {
        id                          = "terraform-series-bucket-update"
      ~ tags                        = {
          ~ "Name" = "Terraform Series Drift" -> "Terraform Series"
        }
      ~ tags_all                    = {
          ~ "Name" = "Terraform Series Drift" -> "Terraform Series"
        }
        # (9 unchanged attributes hidden)

        # (1 unchanged block hidden)
    }

Plan: 0 to add, 1 to change, 0 to destroy.

───────────────────────────────────────────────────────────────────────────────────────────────────────────────────────────

Note: You didn't use the -out option to save this plan, so Terraform can't guarantee to take exactly these actions if you
run "terraform apply" now.
apply コマンドを再実行すると、tags が元の設定通りに更新されるのが確認できます。
terraform apply -auto-approve
...
Plan: 0 to add, 1 to change, 0 to destroy.
aws_s3_bucket.terraform-bucket: Modifying... [id=terraform-series-bucket-update]
aws_s3_bucket.terraform-bucket: Still modifying... [id=terraform-series-bucket-update, 10s elapsed]
aws_s3_bucket.terraform-bucket: Modifications complete after 13s [id=terraform-series-bucket-update]

Apply complete! Resources: 0 added, 1 changed, 0 destroyed.
まとめ
これで、Terraform におけるリソースのライフサイクルについての学習は完了です。
次回は、Terraform における 関数型プログラミング(Functional Programming) について学んでいきましょう。